Showing posts with label starter. Show all posts

Sunday

How to make Tartine Bread Starter

I have taken my baking to the next level. Kind of like an over-eater or alcoholic I'm obsessed. Now I have made Sourdough in the past and been satisfied but now it is a battle with myself. My original sourdough turned out ok if you ask me. The rye bread well how do I put it boring but good rye.

So now I set off for Bread Alley my own kitchen. Yesterday I did try to make a loaf and one stuck to the pan. The other is good and tasty but the size of a half cantaloupe.


Do not get me wrong I have made some delicious bread's but I am a girl who wants better than the last attempt. Does that make sense?

So here we are day two the starter is back out of the refrigerator. I do make a mean loaf of Country Bread from a book I purchased in San Francisco called Tartine Bread. I bought it on one of my visits to  my daughter "Ms.Independence" on the Island of Oakland.


This is my Tartine Adventure in Bread Baking thank you for joining me.


Well by now it is day three I have spent most of the morning reading a website Azelia's Kitchen the site is brilliant and just a wee bit more understandable yet I must be a word dork. I am really making my starter by smell and bubbles. She has gotten me closer to an understanding but again I have both my starters out now. Her website breaks it down so you completely understand the making as well as the science.


So with everything ready here I go. Here is the Recipe to get your starter going. You need two Quart wide mouth mason jars or comparable plastic or glass no issue. I just do as much stuff with glass. Not big on plastic but that is another post.


Tartine Starter from the Book!

To make a Starter you need Culture. No not personal Culture Starter Culture. The Culture is created by flour and water being combined.  The combination of the wild yeasts and bacteria present in the flour, the air and your hands begin the fermentation immediately. After this all begins you just need to feed your Starter.


I have made starter from powder San Francisco starter I sent for to try all ways and it to turned out great. You will need 5 pounds of flour this seems like a lot but you are going to use it to build the starter and feed it.  Half all purpose flour and half whole wheat flour mixture.


Alright to get started you will mix in a quart wide mouth mason jar or a small clear container that you can see through. Fill halfway with warm water.


Now add a hand full of your 50/50 flour mix to the water and mix  to achieve the consistency of a thick pancake batter with no lumps.


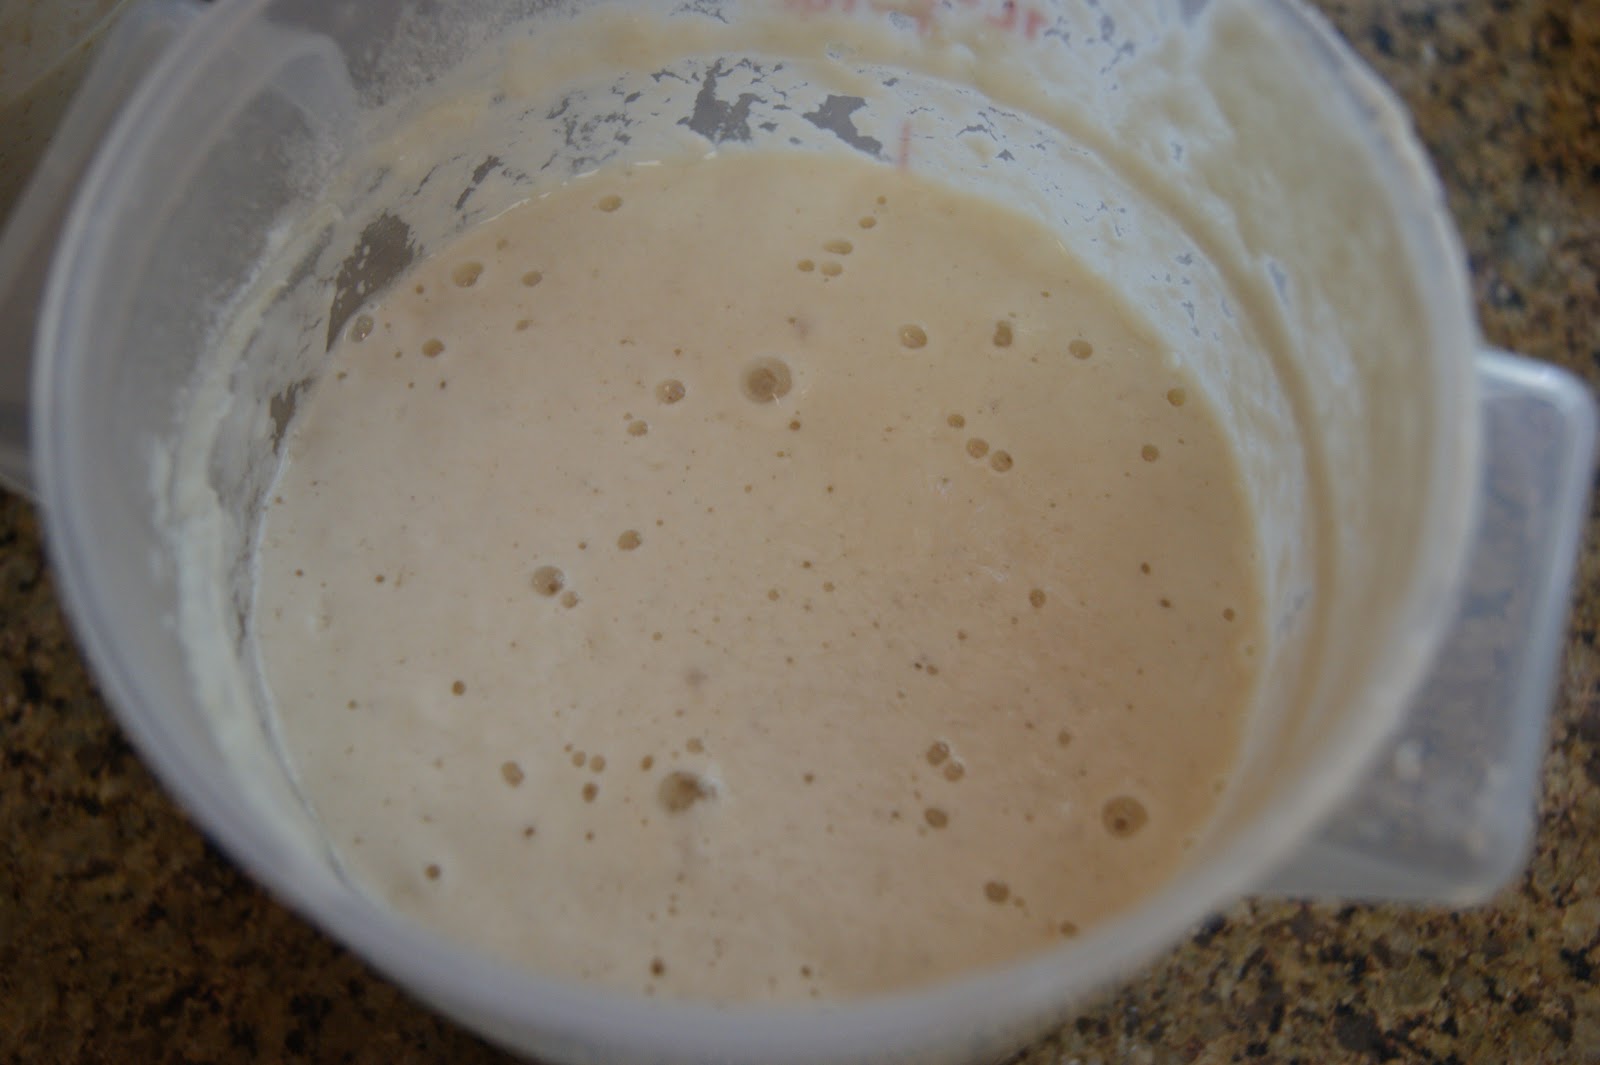
Use a dough spatula to clean the clumps off  the sides of the container. Cover the container with a kitchen towel and put it in a cool, shady spot for 2 to 3 days. After 2 or 3 day's you should have some bubbles like the picture to the right. If not give it a few more day's.


After 2 or 3 day's check and see if any bubbles have started to form around the sides and in the middle.  If not let it sit for a couple more days. Stir it


Once the starter has a film on the top and you pull it back and it is bubbly and smells like stinky cheese and has a sharply acid taste you are ready to start feeding your starter. Fermentation has started your ready for Lift Off!


To feed the starter you will need to remove 80 % of it. Replace it with equal amounts of warm water to the 50/50 flour mixture.
Do not worry about the quantities in these feeding you want a thick batter. Like a good thick bubbly pancake batter.


You want to repeat this process every 24 hours  As the volume of the batter increases you will notice the batter becoming bubblier and thicker. Your bacteria is growing.


This process is daunting but worth the effort. In the end you will have a starter you an use for years to come. You can also share it with other like minded baker people. The picture to the left is a beautiful starter and yes it is mine! Proud Mother Starter!


Well the next post will take you through the Making of the Leaven and the Dough


Look  at the pictures they look pretty darn good. But just not good enough for me! If you are a baker you know what I am talking about. I have many a satisfied eater but it is like at Thanksgiving and someone says "You carve the turkey you do it so well" what you meant to say was "You carve the turkey because no one else wants to do it"

Monday

Rye Bread


All my breads are started with my Mother Starter. I got it from a friend about a year ago. With this starter I can make bread for a lifetime. It is something that every cook should have "A Sour Dough Starter" and it is a breeze to keep. Once you have a good starter you need only keep it refrigerated and every time you use it you will feed it. I have my San Francisco Sourdough recipe is here it took time to perfect it.

 Here is Rye Bread for now


Rye Bread


1 cup sourdough starter, at room temperature
1 1/2 cups rye flour 1 1/4 cups warm water.
1 cup whole wheat flour
1 3/4 cups all purpose flour, plus 1/2 cup all purpose flour
1 teaspoon salt
1 tablespoon sugar
2 1/2 tablespoons caraway seeds


Combine starter, rye flour, and one cup of the water in a large bowl. Stir to blend. I like an extra-sour flavor (like my sourdough) I cover mixture with plastic wrap and let it sit in a warm place over night or 6-12 hours until bubbly and sour, even boozy, smelling.


I start my dough right before I go to bed so that the next day I have fresh bread for dinner. After the mixture has rested 6-12 hours start by Combining

1 cup whole wheat flour
1 3/4 cups of the all-purpose flour
salt, sugar, and caraway seeds

I use my Kitchen Aid stand mixer on low speed until dough comes together.


Knead 9-10 minutes in Kitchen Aid stand mixer on speed #2 until dough is smooth and springy * add more all-purpose flour, a tablespoon at a time during the kneading process as needed to reduce excess stickiness (this particular dough will remain somewhat sticky)


Place in a large bowl cover and let rise about 1 - 1 1/2 hours in a warm place until doubled. Punch down dough and knead a few strokes to release air.


Shape into a round loaf and place on a greased baking sheet.
Cover loaf lightly and allow to rise about 1 hour until almost doubled.


Once your loaf has doubled spritz it with water and put in a 400 degree oven. Cook for 15 minutes then turn the oven down to 375 and spritz once more with water. Continue cooking for about 30 minutes or until top is crisp.


The water makes the crust crunchy. If you want a lighter crust not so crunchy do not spray it.


This is delicious rye bread.  Crusty crunch from the outside with Ryelicious inside.

Sunday

Making a Sourdough Bread Starter


Bread/ Sourdough Bread Starter has never been easier! The first job is to make yourself some starter. There are a  ga-zillion starter recipes out there. Go get one. I made mine from a recipe that had me carrying this started around for three weeks feeding it daily. 


And I have made Starter from scratch. 

Both ways are in this post !

It was like they do to the Junior High Kids now when they make teenagers take home a fake baby doll and play parent Truth be told it was pain in the ass not easy.

Let's make this as easy as possible. YOU CAN  buy your starter from a reputable source. I bought a starter (Need to try everything to tell you) and it came with a book and I will give you the 411 on both ways. The bonus is you can use your starter which ever way you choose to do it to make so many other breads as well as baked goods. I made a killer Rye bread , so here is the link to get your power started and get you started by mail !

 Sourdough International

BUT You only need to do 2 things Activation and Prep your own !!!!!

Lets get started with your dried culture starter if you bought it.  Other wise scroll down to the Make my Own Section.


You must activate it by feeding flour and water. You will only activate once Use a one quart wide mouth jar. Mix all the dried culture with 3/4 cup of flour and 1 cup of warm water.(75 degrees to 85) and proof in a warm place (about 85 degrees) for 24 hours.
Put the jar lid on loosely. The temperature is critical when activating. At the end of that time a few bubbles may appear on the surface as the first sign of growth and activity. In the next 24 hours growth will start to accelerate and the culture should be fed every 6 to 12 hours with one cup of flour and 3/4 cup of warm water until there is a layer of foam and bubbles an inch or two thick. This may require several days and several feedings.

There is no visible evidence when the bacteria grow, and they will be using nutrients even though the culture show no bubbles, so you must follow the feeding schedule.

If the culture keep's doubling the size of your starter, in 10 days you'll have enough to fill a swimming pool. And 12 hours later, you'll have enough to fill two swimming pools. So, before you feed the starter, take half of your starter and set it aside.  But you can start smaller batches to gift to your neighbors and friends. You would be amazed how many people love to get starter already stared! 

Make my Own Section


Basic Recipe needs nothing more than some flour and water and a week of babysitting. Let's go to the Pantry and get it started from scratch !


Ingredients and Instructions

1 quart vessel glass or plastic (no metal)
Measuring cup (Many people use a scale but no everyone has that on hand)
Spoon for mixing
Towel to cover vessel
7 days to watch

3/4 of a cup plus 2 tablespoon's of all-purpose flour
1/4 cup of warm water 

Take your jar and add the flour. Next add your warm water and mix. It should have the consistency of pancake batter. It will get thicker as it grows.

Let this sit for 24 hours. When you check it there will be bubbles. You do not need a lot just bubbles. Bubbles lets you know the bacteria is growing. Now your first feeding. Discard a little more than half of your starter. (I use other jars to make starter to give away) Now add 3/4 cup of flour and 1/2 cup of warm water. I think warm water is key to keeping it warm and fuzzy.

The reason you ask. Well the bubbles = wild yeast and that help fight off the bad bacteria. The bubbles will eat the sugars and that in turn makes more bubbles (carbon dioxide) and alcohol. This makes more acidity. Remember new starter has a funky smell until it gets to that time when it smells mild, sweet and yeasty.

Making your sourdough starter will take 5 to 7 days. Every day you do need to feed it. This really varies so much. Once you start to make starter you will better understand this. A normally warm home will do to keep it going and live. The main things to watch for are bubbles and smell. If you do not see bubble's in 3 days or so. Starter over!


This is my starter I had to take it to my Mama's with me. Mama said it was like having a new born baby in the house. We use to laugh so hard about the "Starter Baby" 


We went shopping one day and ran back to the house to feed the baby starter. xoxo
I tired to tell you ..... But the end results are years of homemade sour dough bread.


 Here is a cup of my end result. A beautiful bread starter !


 Here is a website that is all about Sourdough the go to place   for any baker of sourdough breads.

  Now get me a stick of Butter!