Showing posts with label desert. Show all posts

Friday

Peachy Buttermilk Muffins


During the Summer Season wh
en fresh fruit is abundant. Peaches are delightful and sweet. I love using buttermilk or yogurt in any of my baking recipe's. Either one always makes any cake, cupcakes, muffins so light and moist. 


Ingredients

  • 4 eggs
  • 1/2 cup soften butter
  • 3/4 cup granulated sugar
  • 2 tsp vanilla extract
  • 1 cup yogurt
  • 1 cup buttermilk
  • 2 1/2 cups all purpose flour
  • 1/2 teaspoon baking soda
  • 1 teaspoon baking powder
  • 1/2 tsp cinnamon
  • 2 cups freshly diced peaches
Preheat your oven to 375 degreez


The first thing you want to do is mix the 
eggs, butter, sugar and vanilla.  In a large mixing bowl add these ingredients and mix this up until the sugar has dissolved. 


I run my finger through the mixture and taste the granules should have dissipated.

Now you can add your yogurt and butter milk to the mixing bowl. As a side note there are more ways to make muffins then you could imagine. I have done my Banana Muffins for years with half the ingredient's but I love to experiment and these were worth it.


Chop your peaches. Use fresh the frozen are to wet for muffins or baking. I always chop more than needed and freeze for other recipes. It is good to do while they are in season.


Once this is all mixed well move on to sifting your dry ingredients into a separate bowl. Sift the flour, baking soda and powder and the cinnamon. I always sift my dry ingredients together this way everything is mixed evenly.


Now is the time to add your peaches. Add the peaches last and mix by hand. I like to mix by hand because this way I do not smash or rip the peaches I want whole bites of peaches.


Once well mixed you can pour the batter into greased muffin tins. Bake for 18 minute's or so. Keep an eye on them as every oven is different with the amount of heat it generates. This recipe should give you about 24  standard muffins or 6 to 12 jumbo muffins. 

An added bonus on these muffins is to add a crumble top. You want to add the crumble prior to cooking them. The ingredients are as follows and so easy adding a crunch on top of your already delicious muffins.

Crumble Topping

1/4 cup melted butter
1/3 cup flour 
1/3 cup brown sugar
1 tbl white sugar
1 tsp cinnamon

Mix all the ingredients together and top the muffins. Top muffin's prior to putting them in the oven to cook. 

Saturday

Banana Toasted Pecan Cake


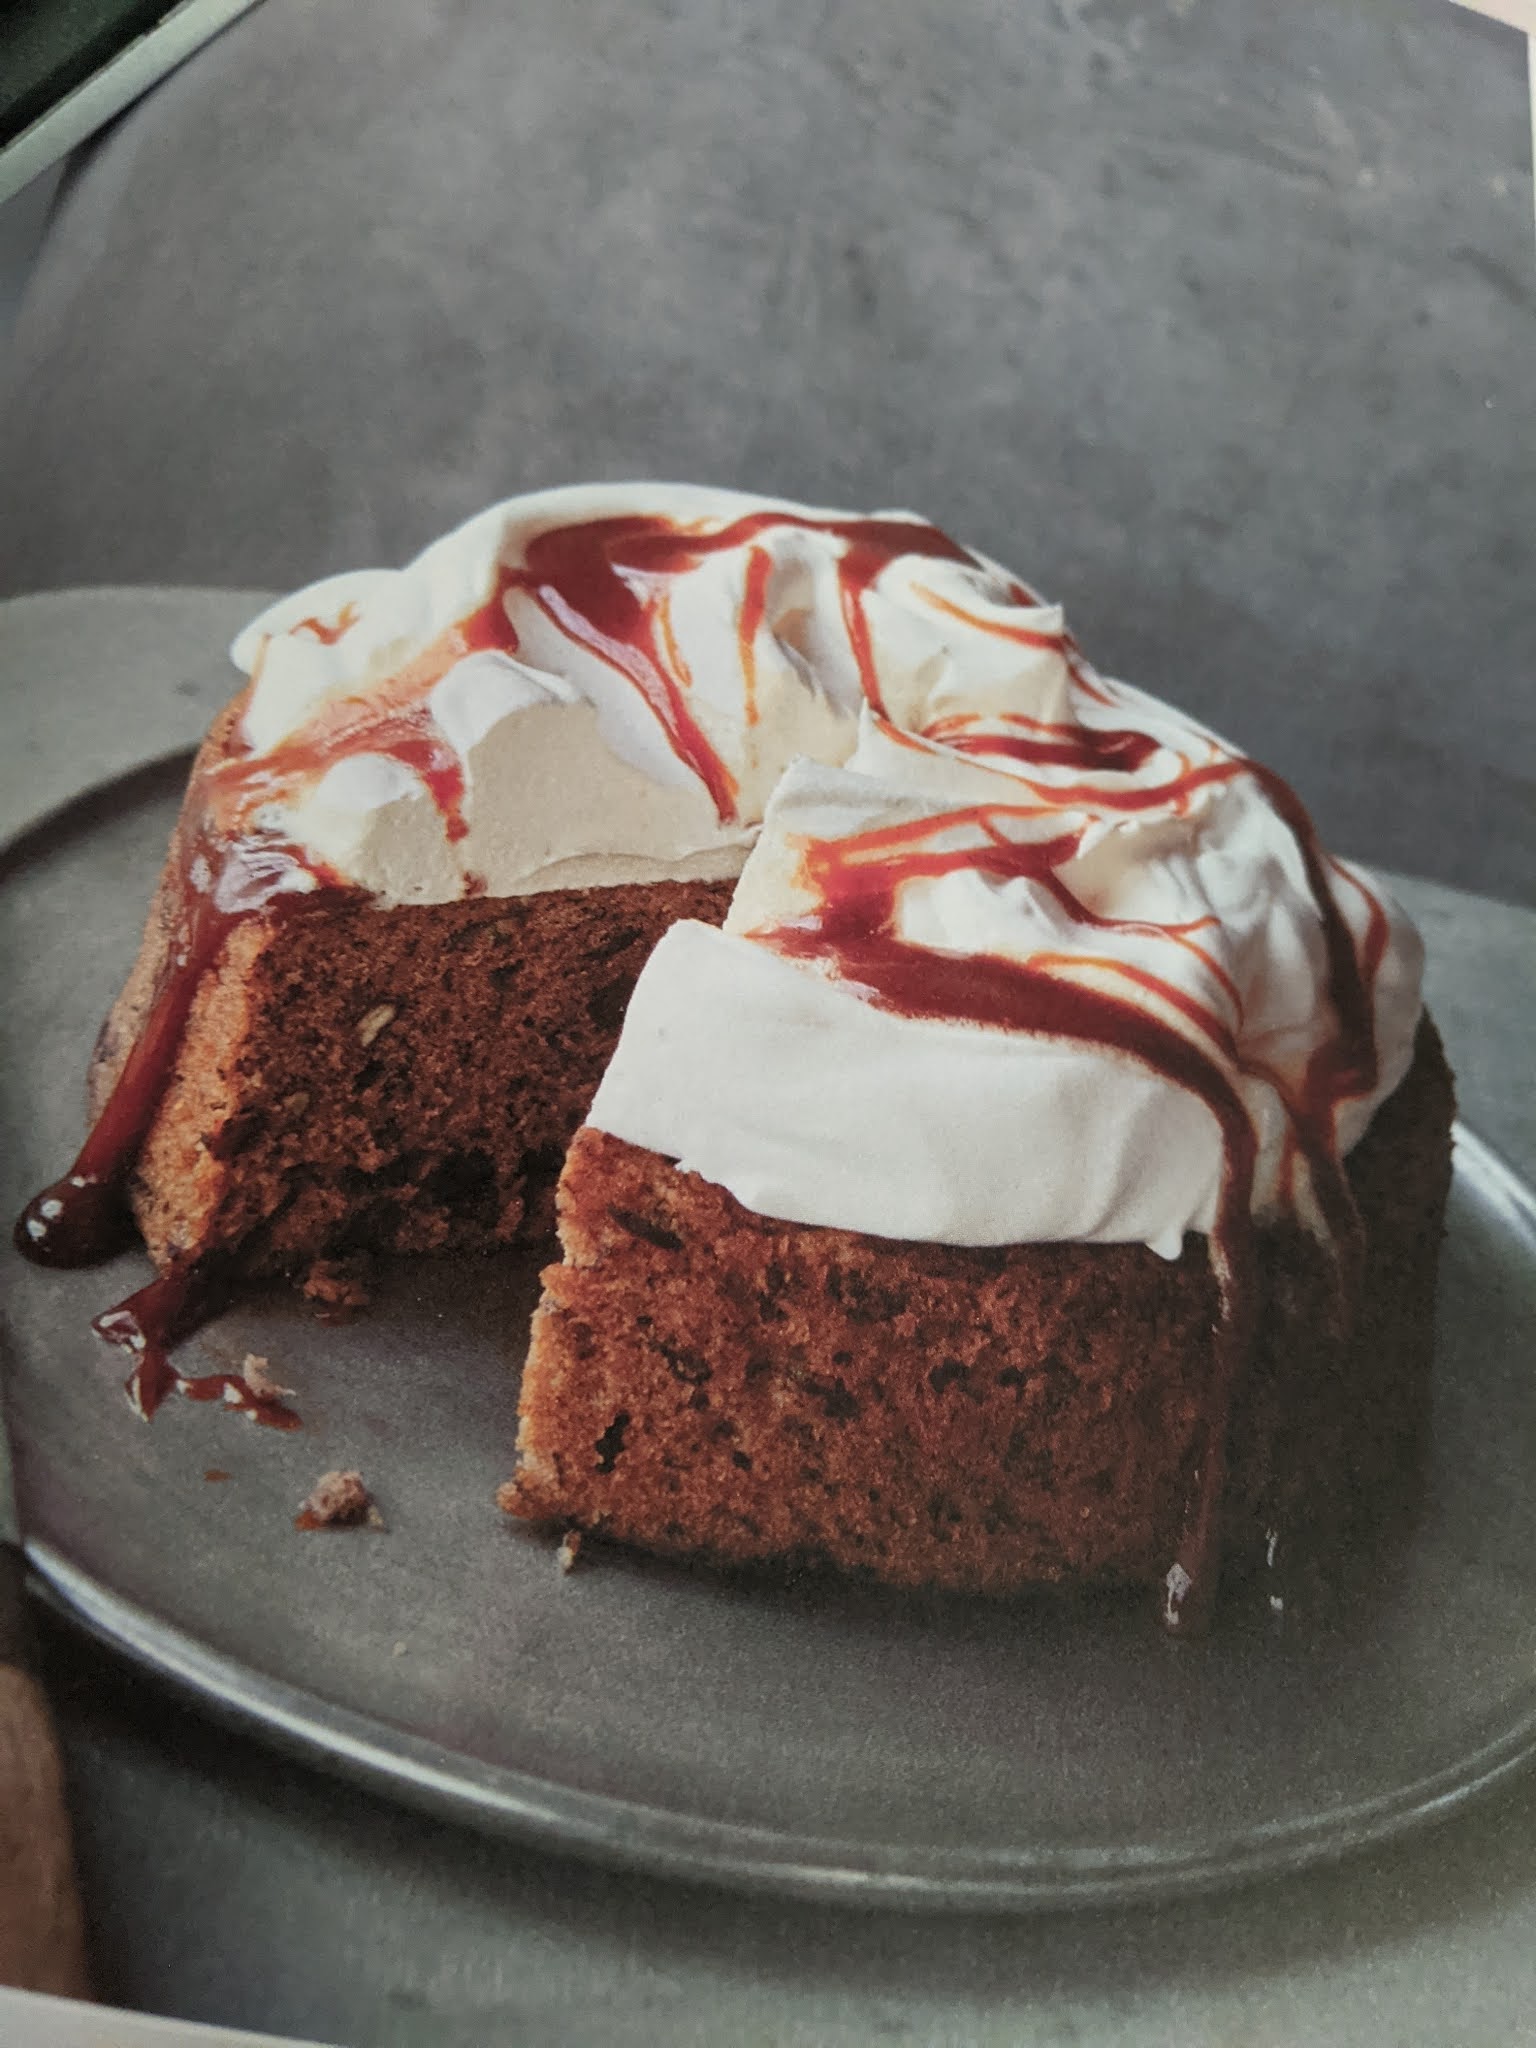
This cake looked so delicious in the book and I happened to have a few left over bananas from smoothies. I am giving you the picture of what the cake should look like and what it actually looked like at my home. Now mind you I baked it 2 different times to make sure I had it right.


For me this cake turned out more like a Banana Hockey Puck. I am giving you the whole recipe word for word so hopefully someone will please prove me wrong. 

Ingredients

  • 3/4 cup all-purpose flour
  • 1/2 teaspoon baking soda
  • 1/4 teaspoon kosher salt
  • 1/4 teaspoon cinnamon
  • 1 large egg
  • 1/2 teaspoon vanilla extract
  • 1/2 cup firmly packed brown sugar
  • 3 tablespoons unsalted butter. melted
  • 1 banana peeled and mushed
  • 1/2 cup pecans


Toast your pecans and let them cool. 


Line the bottom of a round pan that fits the Instant Pot (bought separately) Lightly grease the sides of the pan and place a round piece of parchment paper in the bottom and set aside. 


Sift together the dry ingredient's all but the brown sugar.


In a bowl combine banana and the butter mix thoroughly. 


Beat in the egg, vanilla and brown sugar until well blended. 


Yes indeed that is a hand blender. 

Add the flour mixture until it is completely absorbed. 


Last mix in the pecan's


Pour the batter into your pan 


Preparing your Instant pot. Put 2 cups of water into the Instant Pot. 


Lift  your cake pan and place it into the Instant Pot you can place a wire rack with handles to lift it out (bought separately) but not necessary unless your pan leaks. 


You could use aluminum to make a sling/lift type thing to put around the pan to lift out. Get creative. 

Secure the lid of your Instant Pot and set the Pressure Release to Sealing. Keep in mind the Pressure Release Value and Sealing Value (same valve) are very flimsy you will think this is not right but it is ok. It has a lot of give. 

Select the Manual Setting and set the cooking time for 30 minutes at high pressure. This setting and buttons took me a LONG time to get right. It is more like a timing thing do it right away. 

Once the timer has gone off let the Instant Pot sit for about 15 minutes and then move the Sealing/Pressure Vent to Venting and release the remainder of the steam. Open your Instant Pot carefully remember it is full of Hot Air so twist to open and tip the lid away from you to open. 

Once open you will see your finished cake. I went onto shock thinking the cake was a wet blob of dough. I touched the top and it was cooked. 


So I removed the "cake" and let it cool for 15 minutes. Once cooled I took it out of the pan and place it on the plate. Humm interesting. 


This cake was a circle of what I could have used as a walking stone in the yard. Trust me no amount of whopping cream or butter could have soaked into this. 


The picture next to this is mine compared to the one in the book. Now this was an Instant Pot Book made for Instant Pot by an Instant Pot user. 


I am going to make another few recipes from the book but do not want to bash a book that I personally think is crap because others may do great with it. 

Ok next I am going to attempt to steam a few vegetables. Simple enough you would think! 

Thursday

Dad's Banana Bread

Baking Banana Bread was something my Daddy did very well. I had finally gotten him to give me the recipe and I made little loaf's for the Holiday gift giving. I have this notion that our parents make things and we think they are the best in the world. Truth be told it is just the love and time they put into it that makes us love it so much


I looked at other recipes for banana bread and the results were really almost identical. But Love is the key to family and baking and cooking.

***When ever a banana starts to get over ripe I bag it and put it in the freezer for baking

Banana Bread Ingredients

  • 1 3/4 cups of flour
  • 2/3 cup of sugar
  • 2 teaspoon baking powder
  • 1/2 teaspoon baking soda
  • 1/4 teaspoon salt
  • 1 cup mashed banana - - good and ripe
  • 1/3 cup of shortening
  • 2 tbsp. whole milk
  • 2 large eggs
  • 1/4 cup chopped walnuts

Daddy's Banana Bread


In a large bowl sift all your dry ingredients and set aside.

When I bake I like to get all my ingredient's together and ready. This way I can add and make my batter with out having to get this and that.

With an electric mixer beat the banana, shortening, and milk


Add the eggs (one at a time)  mix completely prior to adding the second egg


FYI the reason I sift all my dry ingredients together in a separate bowl so there are no pieces of flour that need to be broken up.

Add the flour mixture slowly into the mixer making sure each entry is fully mixed in. Once everything is mixed fold in your walnuts.


Grease and flour your baking pan/pans. Pour your batter into your baking pan. I usually make more batter than needed thus as you see extra big muffins came with this batch

Bake your banana breads accordingly. This mean the oven is at 350 degrees. If it is a regular loaf pan cook for approximately 45 to 60 minutes. I baked mine for 45 but kept an eye on it  Look when it starts to get a beautiful brown top put a toothpick through the top and if it comes out clean you are good to take them out.


Let them cool on a wire rack and Enjoy

Monday

Peanut Butter Brownies

These Peanut Brownies are so delicious I make them and POOF they are gone. I mean who does not like peanut butter. Sorry to those who are allergic. 

 Ingredients

1/4 cup plus 2 tablespoons unsweetened cocoa powder
1/4 tsp baking soda
1/3 cup vegetable oil
1/4 cup of boiling water
1 cup of white sugar
1 egg
1/2 tsp vanilla extract
2/3 cup of all purpose flour
1/8 teaspoon salt

Peanut filling

4 tablespoons unsalted butter room temperature
3/4 cup peanut butter * I used nutty because I like the crunch but either works
1/2 cup confectioners (powder) sugar
1/4 teaspoon salt
1/2 teaspoon pure vanilla extract

* Can be topped with 1/2 cup crushed peanuts

Preheat your oven to 350 degrees

Prep your baking pan.
I will line mine next time with parchment paper because the brownies stuck in a few corners.
But your options are to line with parchment or grease the pan or both. First spray the pan then add the parchment paper with the ends coming over the edge of the pan to make lifting out the brownie's easier.

I make the chocolate part of the brownie in my mixer making sure not to over mix.
The peanut butter part in a separate bowl by hand.


To start in your mixer or large bowl sift together the cocoa and baking soda. Add the boiling water and 1/3 cup of the vegetable oil. Mix until this is well combined and thickened. Mix in the egg, remaining oil, vanilla and sugar until well combined. Last add the flour, salt mix in until it is all incorporated .


Now for you peanut butter layer:

In a separate bowl mix together your peanut butter, butter, and vanilla until it is thinned and smooth. Add the Powered sugar and salt. Mix this until it is smooth and well combined.


Assembly

When you assemble this think more chocolate on the bottom of the pan, leaving enough of the brownie mix to swirl on the top.
Next look at the pictures that is why I love taking them. Put your chocolate enough to cover the bottom of the pan.


Spread the peanut butter on the next area across the top you can do like I did or dollop it. Get creative. Now pour the last of the brownie mix on top.


To swirl the top I took the end of a knife and gently swirled it. The swirl depends on the amount of peanut butter you want throughout out the dish. Swirl a lot to spread it even swirl a little to keep the peanut butter in clumps. Either way it will cook the same.


You can kind of see the swirls on the top.


 Also the picture below is of the batch I made with added peanuts. I love nuts. So the addition of that nutty-ness was fabulous. 


And then a little extra brownie topping on top of that ! 


Bake your deliciousness in the preheated oven at 350 degrees. For 35  + minutes use a toothpick to check it. You put a toothpick in the center and it is ready when it comes out clean. Let it cool on a rack then serve.

Adapted from this Original recipe link

Old School Buttermilk Pie

Buttermilk Pie well you know I had to defrost some buttermilk for some cookies I was making.


This Buttermilk Pie for my Pa was worth the time. Wait it took no time really gee ! I always have buttermilk in the freezer because I always have more that I need when baking. So out came the buttermilk and in goes the Buttermilk Pie. The funny thing is that no one but my Mama ever heard or had it. 


Strange how some of  the food's our parents-parent's made are either dying or forgotten. 
Well this Buttermilk Pie has been revived by this family for generations to come. Let's start by making the crust


Ingredients for the crust

1 packet of graham crackers from a box (It usually has 9)
1/4 cup of brown sugar
1 tsp pure vanilla extract
1/4 cup of butter room temperature or melted

In a food processor grind up the graham crackers until reduced to crumbs. Add the sugar and pulse until combined. Pour in vanilla and melted butter and process until crumbs are all moist.


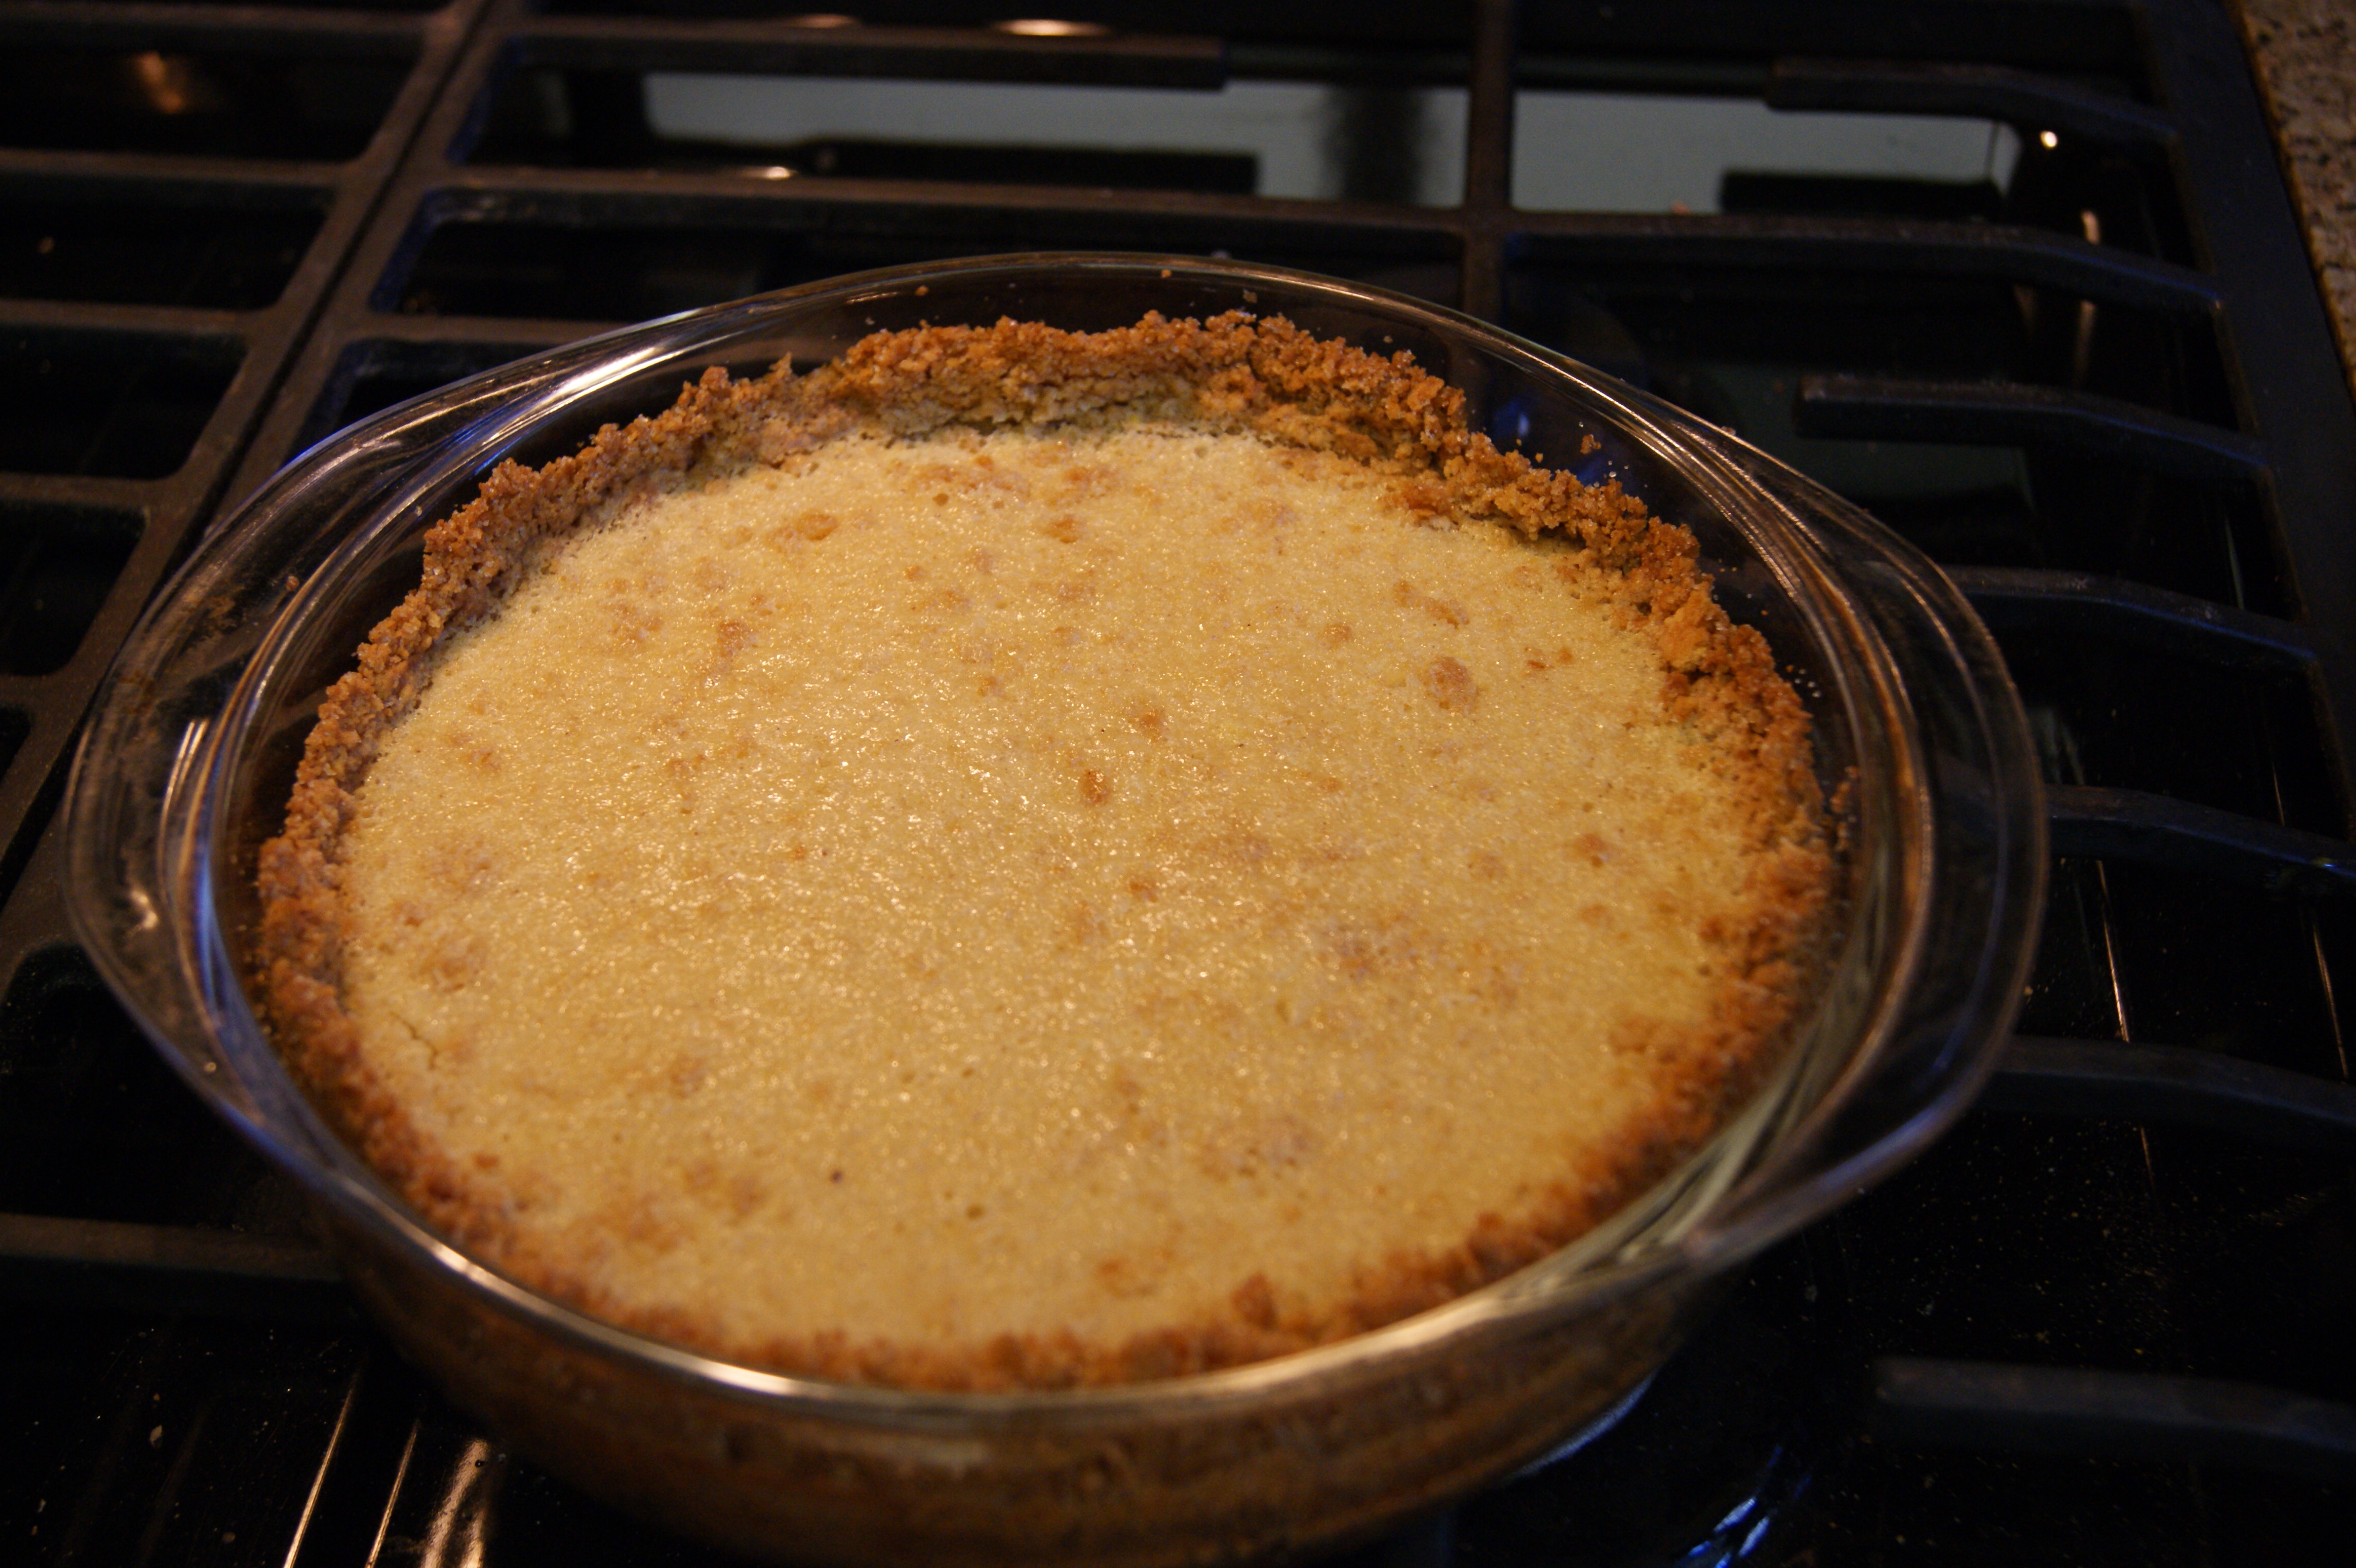
Press firmly and evenly into a 9" pie pan. Make sure you push it up the side till it is a safe distance from the top of the pan. Look at my pictures and notice that the crust shrunk after it baked. You can bake the crust at this point (or not) in a 375 degree oven until edges are brown. Then set aside to cool.


* Crust changes I made. I used brown sugar it make a more flavorful crust and give the edges a little crunch. Break up your graham crackers prior to running them in the food processor other wise you get to many big chunks. I left the pieces of graham cracker that did not break up. Some of them were about say little nugget size and they floated into the pie, so good!. Also I did not bake it prior to filling it and it turned out great. Actually I forgot to bake it because I was so excited and lucky me it was ok. And last but not least once the crumbs were crushed in the food processor I turned them out into a bowl added the ingredents for the crust and  mixed the crumbs by hand. I like to feel that the cracker crumbs is completely saturated and I do not like my crust to be pulverized by the food processor. I am a texture girl.

I had to show you my home made vanilla extract .Try making some it is a no brainer so easy. Actually it makes itself.

Ingredient for Buttermilk Pie - Preheat your oven to 350 degrees

2/3 cup brown sugar
3 tablespoons all purpose flour
1/4 teaspoon salt - sift this and the nutmeg in with the flour prior to adding to mixture
1/4 teaspoon fresh grated nutmeg
3 large eggs
1 tsp pure vanilla extract
1 tablespoon butter (softened)
1 /12 cups of buttermilk

In your mixing bowl combine brown sugar and flour mixture until combined. Add eggs one at a time until mixed. Add vanilla, butter and buttermilk and mix until smooth.


Pour your buttermilk mixture into the prepared graham cracker crust it should fill about a 1/2 inch or so from the top of the crust. Put your pie into a preheated oven 350 degrees and cook for 30 to 40 minutes until the pie is set. It is not the same as cream cheese it should not giggle. It will be light brown on the top. Cool and serve warm or cold.


Friday

Lime Zest Sugar Cookies


It's s that time of year again and I am off to the Fair. The Ventura County Fair . It is so exciting as I did not think I would make it after all that has happened but I did it. I took a whole load of canned stuff that I will post on our Canning Blog. I also took some of the pictures that I took for the first time to the photography section. But the most important part for us is the Baking. It was my first time turning anything in for baking and it was not easy to make so much in so little time. My first thought was to bake and freeze till fair but I wanted it to be as fresh as possible. 

So here is one of the cookies I did. It came off the internet from a women named Karen Baker who posted it on MyRecipes. I tried to find her blog but I do not know that she has one but the link will take you to the original recipe un-tweaked. Either way in my mind it is a Blue Ribbon winner and hopefully it will be. Enjoy.


Lime Zest Sugar cookies

Ingredients 

3/4 cup butter softened
2 cups sugar, (divided by 1 1/2 cup and a single 1/2 cup)
Zest of 4 limes (about 4 tablespoons)
1/2 cup sour cream
2 large egg yolks, at room temperature (let them sit out for 30 minutes)
2 tablespoon fresh lime juice
1/2 teaspoon kosher salt
2 teaspoons baking powder
2 1/2 cups flour

Here are some of the things I did to tweak this a bit. So it is up to you to take these up or down a notch depending on your taste it does not change the texture of the cookies. I added an extra tablespoon of lime juice. And I added two extra tablespoons of lime zest.

The mixture:
  • Beat butter, 1 1/2 cups sugar, and lime zest on medium speed until lightly & creamed
  • Add sour cream, and beat just until blended
  • Stir in egg yolks and lime juice, scraping down sides of bowl
  • Add salt, baking powder, and flour, and beat until blended
  • Chill dough 1 hour..... I made extra and froze it


To prep and cook: 
  • Preheat oven 350 
  • Line 2 baking sheets with parchment paper
  • Place the remaining ½ cup sugar on plate
  • Shape dough into 1 inch balls and roll in sugar
  • Place on sheet
  • Bake at 350 for 20 minutes or until edges begin to brown... bottoms will look golden brown
  • Enjoy !
So sorry there  are not more pictures but it was a lot of work and little time. 
Enjoy

Wednesday

Blueberry Crumb Bars

This truly is what I thought at first as hard desert bar to do. Last night I made it for the second time. One because blueberries are everywhere and two they were scrumptious. Turns out I must have been tired the first time I made them because this recipe was so simple last night. I made a batch to take to the rehab that my Mama is at. Yes it is a Thank you, keep up the good work cookie tray for the workers. I made Coconut Lime Sugar cookies to I will post those later.  The original recipe is from Woman's Day magazine. Enjoy different name and a few tweaks. Oh and of course using our Blueberry Jam since some of you will not have my jam I have shown the recipe using fresh blueberries always the best!

Blueberry Crumb Bars

3 cups of all purpose flour
¼ cup packed brown sugar
1 tsp baking powder
2 tsp orange zest
1 tsp lemon zest
¼ tsp kosher salt
1 cup granulated sugar
1 cup (2 sticks) cold unsalted butter cut into small pieces
1 large egg
4 cups fresh blueberries
2 tbsp fresh lemon juice


1. Heat the oven to 375*

Line a 9 x 13 baking pan with parchment paper, leaving an overhang on two sides


2. In a food processor , pulse the flour, brown sugar, baking powder, orange and lemon zest, salt and ¾ cup of the granulated sugar to combine.


3. Add the butter and egg (* I whisk the egg up prior to adding it) and pulse until crumbly. It should look like wet sand. Reserve 2 cups of the mixture and press the remaining into the bottom of the parchment lined baking pan.


4. In a large bowl toss the blueberries,lemon juice and remaining 
¼ cup of granulated sugar .


Spoon the blueberry mixture over the crust in the pan and crumble the remaining dough mixture over the top.


5. Bake until golden brown, 40 - 45 minutes. Let it cool completely in the pan.


6. Using the overhanging parchment paper, transfer the  crumb bar to a cutting board and cut into pieces.

Homemade Pop-Tarts

Homemade Pop-tarts

Being at my mama's right now is making me think outside my box. She has a mobile home and a small kitchen so cooking is well unique to say the least. I will be staying here during the week until she and my sister are done with their treatment.


They live 6 doors down from one another and I adore being with both so up and down the street I go with baking or cooking at Mama's and running samples down to Sister Casey to test and approve. Here is a project my Mama and I did we did not have the original recipe.


The story goes when I was in Oakland my daughter took me to a great little breakfast place in Oakland called Kitchen 388 the link is not a website but Their FB page if you are up in the area or just passing through go there.

So they make their own pop-tart's thus the idea to duplicate them. Now they use Nutella and I never tasted Nutella. I thought euuu that is about as appealing as spam sandwich...  but  ... I was pleasantly surprised at how delicious they were.   I froze one brought it home to Pa that is the pretty one you see at the start of the post. Thank you Kitchen 388 and here we go.

The main difference is mine were much thicker so with your puff pastry you need to roll it out as thin as you prefer. I like to just slightly roll it because I like the larger pop-tarts as people will eat theirs and not need another. Right!


Ingredients

1 box of puff pastry
1 jar of Nutella - Or filling of your choice
Powdered sugar
Flour for rolling
Cookie Sheet

Preheat oven to 350 degrees.

To defrost your puff pastry use the package directions I let mine sit in the frig overnight. One sheet for three pop-tarts two sheets for six.

Lightly flour your surface that the puff is to be rolled out on. Lay your puff pastry on the floured counter one sheet at a time. I cut the sheet into three equal square (see pictures)


I well actually then Mama put about one tablespoon of Nutella on each of the three  squares. Spread it on the square about an 1/8" you do not need much. I notice the last batch I thought I had not used enough then the next batch to much. With all cooking it is a go figure this is an experiment.


But a good thing is less is better to start. Now you have three squares with their Nutella on them take the plain three squares and place them on top of the Nutella ones.

Now take a fork and crimp the edges about 1/4" in all the way around.


Place these three on the cookie sheet and move on to the next three. Once you have them all on the cookie sheet then pop them into the oven for no more than 15 minutes at 350'.


Keep an eye on them they should look brown on the top and have grown puffy and yummy.


I warmed up some nutella and decorated the tops.

Just take any sandwich baggie and cut a oh so little end corner and wa-la you have a pipe-in bag.


Now enjoy and if you are in Oakland go to Kitchen 388 and try theirs.

Yummy and thank them for this recipe....